About

One Brit, one American and three dogs on a journey to assess different gardening and growing styles, preserving, cooking and beginning a self sufficient lifestyle in Utah.

The Brit is an organic, no-dig, barefoot hippy hiker and the American is a traditional tiller of the garden and wears shoes when hiking.

Sunday, March 1, 2015

Growing Experiment

Dear Readers,

We are going to be running some experiments on different gardening/growing techniques this year. 

The American has already tilled his plot and activated his straw bales with some chemical concoction (he can't even remember what was in the mix).  He was kind enough to build me a raised bed area to keep mine separate.

I also have two straw bales to grow in the organic way as well as a 12"x8" raised bed plot and I'll be taking a 15"x3" strip on the end of his plot too.

My raised plot is going to be split in half to have one no-dig organic plot and one biodynamic plot.

Some cross overs will occur; these exclude seeds across both non-organic and no-dig organic may have seeds which were planted in accordance with Maria Thun's biodynamic rules (root plants on root days for example).  Compost, manure and other mulching media in the raised bed will be organic but not biodynamic.

We'll be assessing the success of each growing technique by a few simple criteria:

1 soil health - indicated by the number of worms found in a given amount of soil.

2 crop yield - the weight of the harvest is taken to determine this.

3 loss to pests/occurrence of pests - each time we spot a pest in our plots we need to take note and/or count  how much damage has been done for example, 12 lettuce seedlings were decimated in plot A but only 3 in plot B.

We will be posting updates on the set up and progress of each growing style as we go through the season. 

The Brit


Tuesday, February 24, 2015

Hay Bale and Straw Bale Gardening


Dear Readers,

We are starting a straw bale garden to try and grow several vegetable plants inside and to assess how well the growing method works for us.  

My other half is using his chemical concoction for fertilizer whilst I shall be growing organically.

To grow in a straw or hay bale, you need to prepare them which means you need to kickstart decomposition of the bale.  The decomposing bale will feed your plants as they grow.  If you can pick up spoiled bales even better since the decomposition process has already started.

To prepare your bale first move it to where you want it to be placed.  Once you start the preparation it will be very heavy.


When positioning our bales we needed to take into account the height of the sprinklers around the vegetable garden as well as what would block the sun, here you can see that the tumbling composter is going to cast shade on the bale.


Now that you have positioned your bale, you need to thoroughly wet it all the way through to start decomposition.


You can add a high nitrogen liquid fertilizer to activate/speed up the process, here my other half is adding some fertilizer mixture he made:


In a few weeks, the temperature of the bale will increase, signalling that decomposition is occurring like the temperature rise that is seen in certain types of composting.  Keep the bale moist during this time.

You can monitor the temperature and once it has dropped and maintained the lower temperature you can plant in the bale.  Higher temperatures can stunt growth or stop it all together so wait until the bale is cool before planting.

To plant, make a hole in the bale and plant directly in.  Add some compost to help the plant adjust to it's new surroundings.  Keep the bale watered and fertilize as necessary.

We'll be posting more as the weather improves and we can start planting.


Monday, February 16, 2015

Thrifty Tips For The Garden

Dear Readers,

I talked about not wanting to spend any money on the garden at my house because I'm moving in with my other half in a couple of month's time.

I'm all for being frugal and re-using, re-purposing wherever I can because that's how I was raised back in Ol' Blighty.

In this post, I would like to share some thrifty tips for the garden to help save some pennies for other frugal gardeners around the world and do a bit of recycling whilst we're at it!  We'd love to hear your thrifty tips for the garden in the comments.

1.  Toilet paper card inner tubes make create compostable plant pots for seedlings.  Place tubes in a container such as a margarine or ice cream tub, fill tubes with potting/seed compost and plant your seeds.  Works well for squashes, beans, peas, carrots.

2.  Make your own compostable plant pots from newspaper.  Roll paper around a glass tumbler or can then fold in at the bottom.  Place in a tray and fill with compost and seeds.

3.  Yogurt pots make sturdy containers for your seedlings too, Be sure to poke some drainage holes in the bottom first.

4.  Large tubs of salad can be used as mini seed propagators/greenhouse.  Rinse out the clear plastic container and remove label.  Place over seedlings in the light.

5.  A piece of sturdy cardboard covered in foil acts as a reflector to help reduce spindly seedlings when growing on a windowsill inside.

6.  Take hardwood and/or softwood cuttings of blackberry, raspberry, salmonberry, loganberry canes, grape vines and fruit bushes such as blackcurrant, redcurrant and elderberry to increase the numbers of plants for free.

7.  Plastic bottles make great individual plant cloches when the bottom is cut off and the lid removed.  Also reduces slug and snail damage to seedlings.

8.  Use grey water (e.g. collected bath water) to water plants.  Some cities require permits to save rainwater run-off, check with your local city to find out if you can collect rainwater to use in the garden and cut down on sprinkler use.

9.  Banana skins around your roses will help perk them up a bit as the skins decompose.

10.  Grow comfrey to make your own comfrey leaf liquid fertilizer.  Other leaves can also be used such as strawberry, bracken, clover, stinging nettles, borage, chicory, yarrow, parsley and even washed seaweed.  Weeds such as plantain, dock and dandelions can be used to make liquid fertilizers or teas. Heads up - they smell terrible but the plants love them!

11.  If you happen to have left over beer in cans and bottles (an unlikely event in our house; we love beer), you can use this to bait traps for slugs.  Bury a container so the top is level with the soil and fill with some beer.  Cover the top with something to keep it dark to don't close off the trap completely so the slugs can't get in.  I prop a flat rock on top of another rock to leave a gap.  Check the traps and you should find them full of slugs.

12.  If growing in containers, broken up styrofoam (polystyrene) packaging can be used at the bottom for drainage.

13.  Plant labels can be made from cutting up plastic milk jugs.  Use a permanent marker or Sharpie to write on them.  Make sure you rinse the carton out well beforehand!

14.  Dried crushed eggshells around your tender leafy plants or fruits may help deter slugs.

15.  Copper wire around pots/containers will stop slugs crawling up to eat your plants.

16.  Old net curtains can be used to cover plants susceptible to pests such as birds or flies (whitefly, blackfly, carrot fly or onion fly).  May also help reduce caterpillar damage by preventing butterflies from getting to your cabbages. 

17.  Coffee grinds are rumored to prevent slugs and when mixed with compost, act as a slow release fertilizer.

18.  Use cardboard egg boxes to start off seedlings.  Plant the whole thing or break each pod and plant that when ready.  The cardboard will decompose over time.

19. Poke plastic bottles with the bottom removed (mouth end down) into the soil near the roots of water loving plants.  Water by hand into the bottle to make sure the water goes to the roots.  

20. Deter birds and deer from your plot by suspending old CDs with string or fishing line.  The movement in the wind and flashing in the light helps to deter animals from the plot.

Mulching

Dear Readers,

Spring is arriving here in the valley early with the recent warm weather; the snowdrops and violets are in bloom in the leaf litter.  My thoughts are turning to what must be done in the garden before I move in with my other half.


When I took the property back in June last year, the original vegetable garden was over run with 6 foot high weeds, grass and associated critters.  After much hacking with shears, scythes, and the lawnmower over several weeks; I was able to knock everything down to a manageable height to dig it over and plant in.   Unfortunately, the weeds had run to seed and sprouted back up before I had a chance to get my plants in so I decided to cover the plot with mulch to suppress the hoard (of weeds) and to add some organic matter back into the soil.

I covered the plot with cardboard which I had acquired when relocating from NJ.  I simply flattened the boxes and overlapped them to ensure that the weeds would not push through and wet the card to keep in place.


I'm sure that you will agree, it is not the prettiest of sites to behold in the garden and since I am due an inspection from the rental company, I want to make sure that the vegetable patch is looking good.

The cardboard has done it's job over winter and has blocked out the sunlight and smothered the weeds.  Numerous worms are now seen in the soil breaking down the rotting weeds and improving the soil structure with their feeding.

I could cut holes in the cardboard and plant straight through with hardy crops such as peas or fava beans (that's broad beans to us Brits) but I'm going to cover with more mulch for aesthetics whilst I get plants started inside.

The mulches I have available from the garden include leaves, grass clippings, shredded dead plants and homemade compost.  I'm not wanting to spend any money if possible on the garden because I'm moving out and in with the other half but I do want to ensure that there are plants growing in the plot and the garden looks nice when the landlords return.


This is the shredded dead plant matter; weeds, blackberry prunings, tree and shrub prunings were left on concrete to dry out then were shredded.  A garden shredder/chipper would have been used if we had one but my other half was able to mow over this lot on one half of the vegetable plot to shred it.

To use, simply spread thickly where you want to mulch.  I'm obviously placing on top of the compost for the moment.

Shredded leaves; these were collected with the lawnmower to chop them up.  Use the same as the shredded plant matter.  I like to wet these types of mulches on the cardboard to reduce them blowing back around the yard.

Grass clippings; simply collect the clippings from the lawn and place on top of the cardboard or soil.  Grass clippings contain a lot of nitrogen which will help to decompose the cardboard over time.

Once the weather is definitely mild enough to plant and my plants are big enough and hardened off to cope with the weather and early pests; I simply move the top layer of mulch and cut the cardboard with a sharp knife in a cross shape and plant through.  You can ease the top layer of mulch around the plant to help retain moisture in the soil.

The downside to mulches such as cardboard is that slugs and snails tend to congregate underneath.  These mulches tend to sap up the nitrogen to decompose so give any plants you plant through a jolly good feed with nitrogen to help them get established.


Wednesday, February 11, 2015

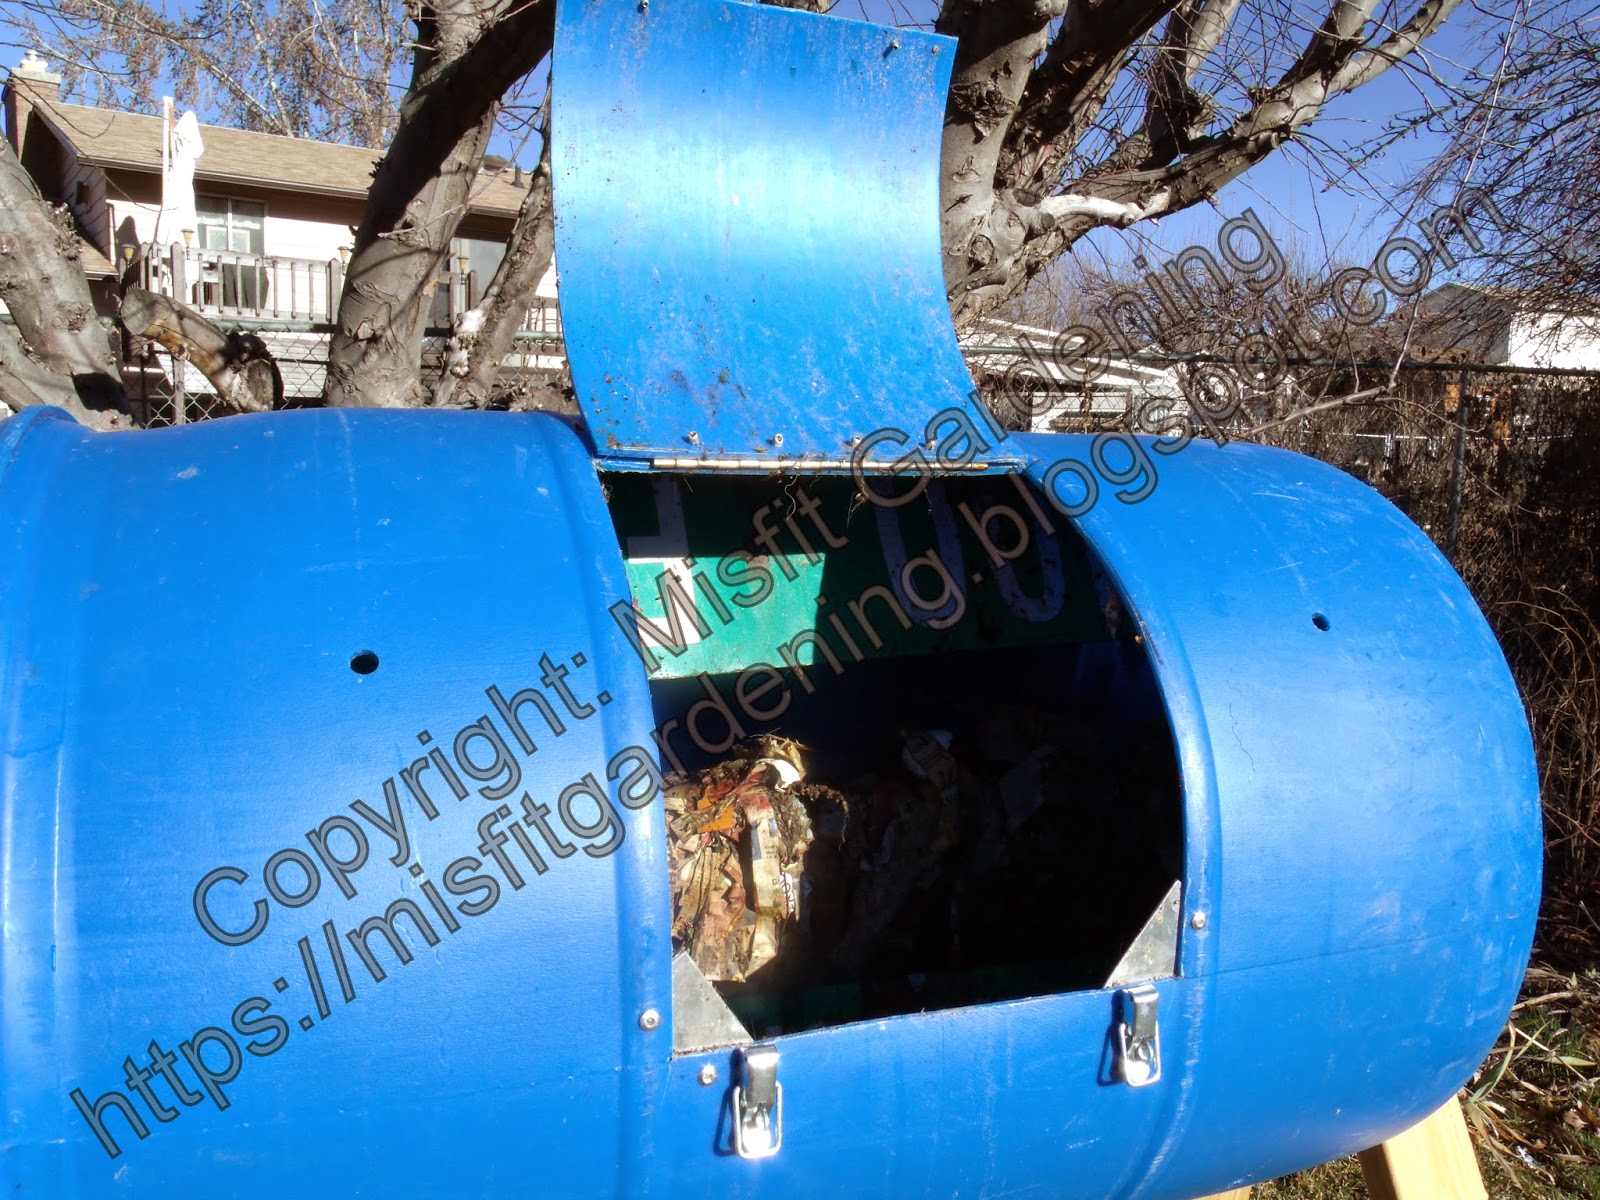
Building a Tumbling Composter

Hello again,

In this post I'd like to show you the tumbling composter that my other half made me.

As an organic gardener, compost is very important to me and the fertility of the soil and the nutrients of the produce we will harvest.


To make the composter you will need:

2x4 cut to the appropriate height (we wanted to fit a wheelbarrow underneath to collect the compost once ready)

2 sawhorse brackets

1 drum (we used a 55 gallon drum)

1 pipe long enough to go through the drum with overhang at each side

metal sheeting to make interior baffles to aid mixing (optional)

hinges

latches

screws/nuts/bolts

saw

drill

To build:

Drill plenty of air holes around the barrel and on the ends.  Don't make them too big or you will lose the compost as the barrel turns.

Cut a large hole at each end of the barrel so the supporting pipe will slot through.


Cut a door in the side to the size you want.  Think about what will be easiest for you to remove the finished compost.  Attach hinges and latches to close the door and keep it secure when turning.


Cut the 2x4 to the height that works for you.  We wanted to be high enough to fit a wheelbarrow underneath.  Slot the wood into the sawhorse brackets and screw to secure.

With some help, lift the barrel with the pole through into the top sawhorse bracket and open up to close.  The barrel should move freely.

Take care when filling the barrel and turning it when it contains material, it will get heavy. Take all precautions to operate the tumbling composter in a safe manner including appropriate positioning and securing of the system.


All content provided on this "Misfit Gardening" blog is for informational purposes only. The owner of this blog makes no representations as to the accuracy or completeness of any information on this site or found by following any link on this site.

The owner of misfitgardening.blogspot.com will not be liable for any errors or omissions in this information nor for the availability of this information. The owner will not be liable for any losses, injuries, or damages from the display or use of this information


Sunday, February 8, 2015

Making Compost: Gardener's Gold

Dear Readers,

Making compost is easy and there are many ways to make it; from worm compost to anaerobic bacteria (Bokashi) composting as well as the traditional compost heaps known by gardeners the world wide.

To an organic grower, compost is very important.  It helps with drainage in heavy soils, it helps to retain moisture in sandy soils or when used as a mulch.  It provides nutrients to the plants you grow and can help suppress weeds if used in a mulch thick enough.

Composting is pretty easy; you collect organic matter and pile it together, turn it to introduce some oxygen to the billions of microorganisms which are turning the waste to gardener's gold and eventually, everything rots down to be a sweet forest floor smelling dark almost black compost.

It starts by collecting the waste to make compost.  Pretty much anything which was once living can be composted.  Some examples include cardboard, cotton, food waste, vegetable peelings, grass clippings etc.  Cooked and raw food scraps such as meat, fish, bones etc can be composted but may attract rodents, raccoon or even bears to the compost pile unless they are treated via a hot composting method or Bokashi system.

We  collect the kitchen waste in a small trash can we picked up from the store for less than $7 but you can pick up nice ceramic 1 gallon crocks for compost if you want a more stylish addition to your kitchen.  Ensure you chop and shred everything up small to encourage faster composting in the main composter.


The compost can is right next to the normal trash can so no-one forgets to put the compost stuff in there rather than the trash.

We include cardboard, newspaper shreddings, vacuum waste, fur from grooming the dogs, vegetable peelings, tea bags, coffee grinds etc.  We layer the green, nitrogen rich waste with the brown, carbon rich waste throughout the can and take it out to the main composter once full or if something particularly bad smelling (bad broccoli comes to mind) has gone in.


Researching compost and you will hear about greens and browns.  To have good compost quickly, you need to have the optimum level of green material to brown which doesn't normally happen for the average backyard gardener.

But what are greens and browns?  These refer to materials high in nitrogen and decompose quickly - the greens and the browns are lower in nitrogen and contain more carbon and take longer to decompose.  Usually the brown materials are dry and need to be moistened in the heap.

Some green materials you can compost include:

grass clippings
dead-headed flowers
vegetable peelings
fruit peelings
manure (chicken, farmyard, zoo)
tea leaves/bags
coffee grounds
spent hops and grain from brewing
comfrey 
kelp/seaweed


Some brown materials you can compost include:

cardboard
newspaper
junk mail (there is some conflicting information about the leaching of inks from newspaper and paper based wastes, we don't compost glossy paper because it takes too long)
cotton
fur
tumble drier lint
vacuum cleaner waste
shrub and tree prunings
chipped/shredded branches and twigs

A diverse mixture of materials in the heap to rot down will help to insure a good mixture of nutrients in the resulting compost.  When I lived on the coast in England I would add washed seaweed to my compost after a storm had washed it up on the beach which added lots of trace minerals to the compost.  Some gardeners also add rockdust to ensure some additional trace minerals are incorporated.

The heap of materials for compost should be moist but not soaking wet all the time.  Check if the heap needs some water regularly, if it does then add some.  If the heap is too wet, cover it from rain if that is the problem or leave the lid off/open if there is too much water inside.

After adding the materials to the heap leave them for a few days then turn the materials using a pitchfork or a border fork to introduce oxygen to the pile for the microbes.  Turn the material from the outside to the inside.

There are many commercial composters available in the marketplace or you can make one using pallets or an old drum.  Ours is a tumbling composter made from a large drum which we turn when material is added to mix it thoroughly.


Greetings


Greetings Dear Readers,

Thank you for stopping by today.

I wanted to begin by telling you about this blog. This is a story about myself (the barefooted Brit) and my other half (the American) on our journey to be self sufficient in growing our own vegetables and living a more sustainable lifestyle in Utah.


We decided to make 2015 the start of being completely self sufficient on vegetables and fruit throughout the year and into spring of 2016.  This blog will cover how we start with both of our differing and sometimes opposing gardening styles as well as cooking and preserving the produce throughout the year.

So join us on our journey and please comment on the posts.

EmsyDoodle, 

the bare-foot hippy hiker who attempts to wear shoes!